Docker: Beyond the Basics
Exploring Namespaces, control groups and ephemeral storage in Docker


This is a sequel to the first blog I wrote on Docker. To get started and know the basics of the same, you can check it out here.
Now, it's time to look into the deeper intricacies of Docker by looking into its foundations like namespaces and control groups, and how containers store their data ephemerally.
Namespaces
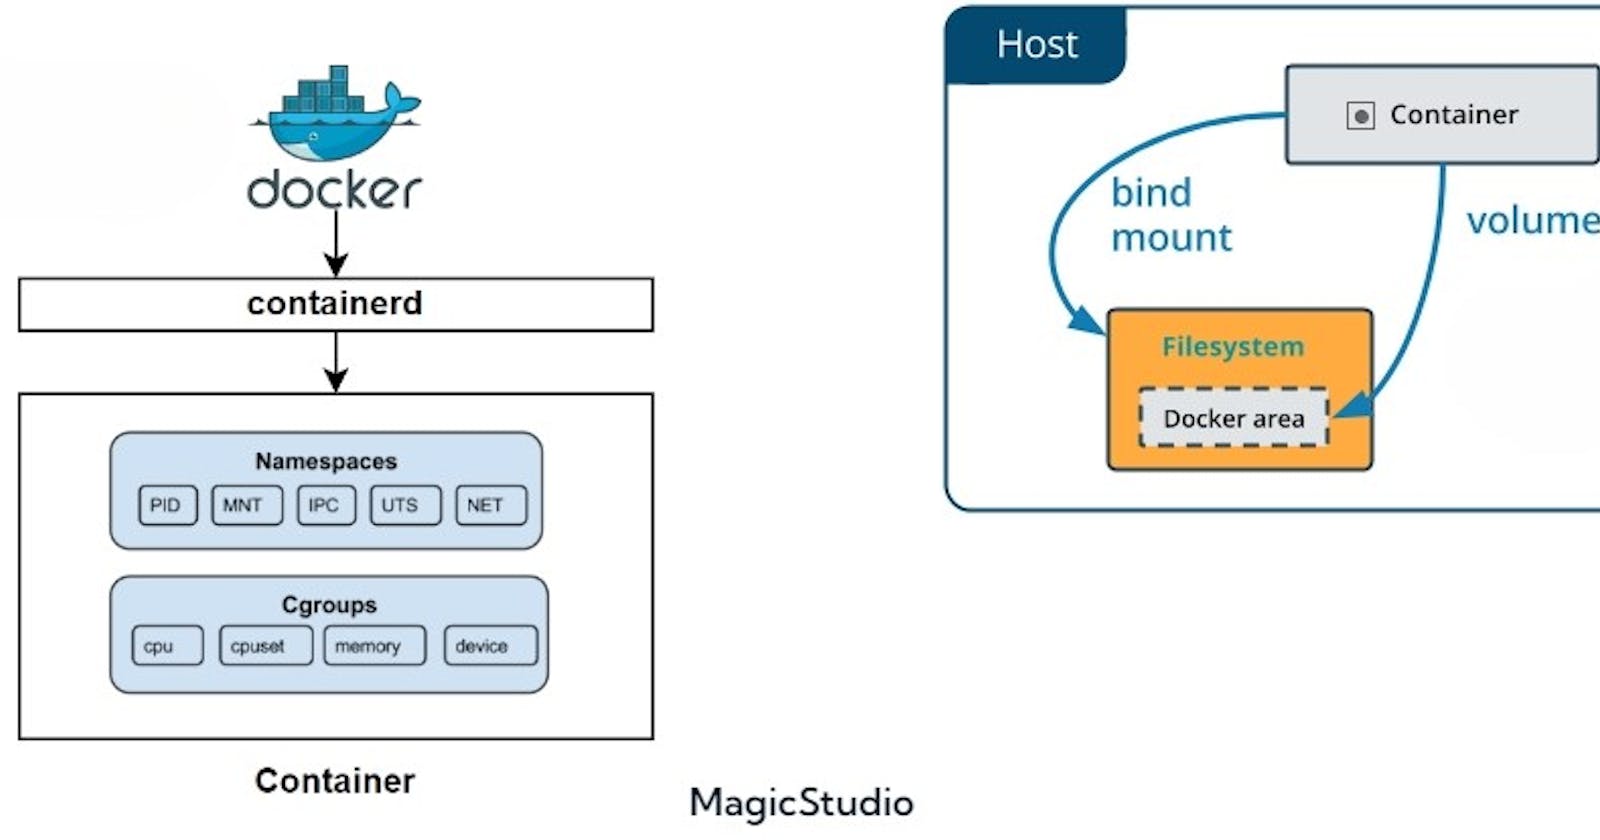
One of the earlier concepts we learnt in Docker is that it allows us to run containerized applications in isolation. This is achieved by using namespaces.
Namespaces are primary features of the Linux kernel that allows separation of various system resources by creating an abstraction layer so that one container cannot know what's going on in the other containers and in the host system. Each aspect of a container runs in a separate namespace and its access is limited to that namespace.
There are different types of namespaces in the Linux kernel:
Process IDs (PID): This isolates the processes from one another both on an inter-container and intra-container level. This means that processes within a container will only know what's going on within them, and not about other processes inside the host container or other containers.
Inter-Process Communication (IPC): This regulates the communication between processes in different containers. Containers communicate with each other via port mapping.
USER: This represents a container running within the user namespace which is isolated from the User IDs and Group IDs of other containers, making them unaware of each other's existence.
Network (NET): This namespace provides each container with its own network stack- like its own port number, routing table, and network interfaces.
UTS (UNIX Time Sharing System): Allows each container to have its own hostname and domain name, separate from other containers and the host system.
Each time a container is started, Docker creates a set of new namespaces for it. Namespaces ensure portability of containers by allowing them to run on the same host without interfering each other, thus establishing itself as a critical feature that serves as the backbone of Docker technology.
Control Groups
Cgroups (control groups), is another feature of the Linux kernel that goes hand in hand with namespaces. It allows you to manage resource allocation to containers. These include CPU, memory, network bandwidth, etc. It primarily aids in limiting the amount of resources that a running container can use. In addition to this, they also provide prioritization of resources.
Cgroups are a key component of containers because there are often multiple processes running in a container that you need to control together.
Let's take an example where we create a new cgroup and try to manage CPU resources using the cgcreate command.
First, create a new directory called mygroup.
mkdir /sys/fs/cgroup/cpu/mygroup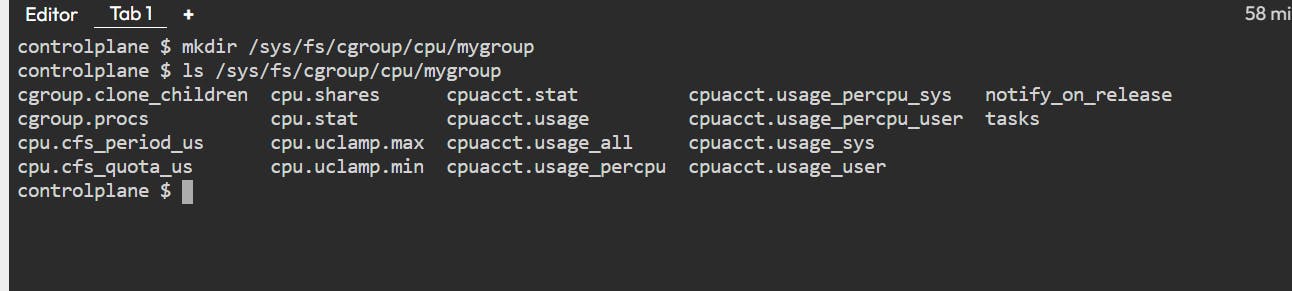
All the other files listed define the limit of the CPU.
Now, assign the CPU resource to mygroup:
sh -c "echo $$ > /sys/fs/cgroup/cpu/mygroup/cgroup.procs"Next, set the CPU usage limit for the cgroup:
cgset -r cpu.cfs_quota_us=50000 mygroup
This command sets the maximum CPU usage to 50% of one CPU core for the "mygroup" cgroup. So now, any processes that are added to mygroup will have their CPU usage limited to the specified value.
If you want to run a docker container with a CPU limit of 50% on single core, then use the below command:
docker run --cpus 0.5 <image_name>
Cgroups also offers mechanisms for monitoring the resource usage of individual containers, which helps to gain insights into container performance and identify potential resource bottlenecks.
Now that we have got these two out of the way, let's segue (smoothly) into talking about another important aspect in the containerization architecture: storage.
Data Persistence in Docker
Docker containers are stateless in nature, meaning that any information that resides inside the container only persists as long as the container is running. Once it is destroyed, so is the data inside it.
As you can probably imagine, this is not ideal -- there are situations when you want to maintain a stream of data beyond the lifecycle of the container: say you are running a kubernetes cluster where containers are being destroyed all the time; in this scenario you would want to have some way to keep your data from being destroyed along with the container.
Docker provides two solutions for such a situation:
Volumes
Bind mounts
Volumes
Volumes are the preferred way to store persistent data in containers. A volume is a directory on the host machine inside the Docker directory that Docker uses to store files and directories which can outlive the container’s lifecycle.
Let's look at some basic commands:
You can create a docker volume by using the
docker volume createcommand.You can inspect the details of the created volume using the
docker volume inspect <volume_name>To mount a volume to a container, you need to use the
-vor--mountflag while running the container. Here’s an example using the-vflag:docker run -d -v my-volume:/data your-image
Here,my-volume, which is the user created volume, is the source, and/datais the path inside the container where the volume will be mounted.To share a volume among different containers, simply mount the same volume on each of them:
docker run -d -v my-volume:/data1 image1
docker run -d -v my-volume:/data2 image2
There is a very subtle difference between the -v or --volume flag and the --mount flag: When you use -v flag to mount a directory that does not exist on the Docker host, the flag will always create that directory for you. On the other hand --mount flag will not create that directory for you and will throw an error.
To remove a volume, use
docker volume rm <volume_name>command.To use a volume, add a
--volume(or-v) flag to yourdocker runcommand.
Note: When you use the same volume name for both containers, it essentially mounts the same volume onto both, and so changes in one container will reflect in the other. If you want to maintain two separate copies of the same volume, simply change the volume name.
Multiple containers can share the same volume, making it easy to share data between them. By default, volumes are anonymous when created. However, you can provide them with a name using the name flag: docker volume create --name <volume_name> .
Apart from this, volumes also offer various other benefits like easy backups and data migration.
Bind Mounts
These also allow you to store persistent data, but they have limited functionalities. With bind mounts, files or directories located anywhere on the host machine is mounted into a container.
This process relies heavily on the host machine having a specific file structure, thus offering limited functionality when compared to volumes.
A bind mount is always referenced by its full path of the host system. If such file or directory does not exist, it will be created on demand.
Note: By using bind mounts, you are exposing the host operating system (including files, processes and others) to the containers. This means that processes running inside the container have the ability to create, modify or delete files on the host operating system. This is a security issue because non-Docker processes could be affected on the host OS.
This method is therefore deemed useful in developer environments.
Conclusion
I have attempted to explain how namespaces, control groups and ephemeral storage methods work in Docker to the best of my abilities. In the next post, we will look into how caching works in Docker images, and how to reduce the size of images. Hopefully, you learnt something new today :)
Do share in your socials about your learnings!
Until the next one 👋🏻